The Easiest Way to Create a Markdown Blog in Next.js
There are so many ways how to create a Markdown blog in Next.js. You can spend a lot of time doing it yourself from scratch.
Personally, I have wasted many hours trying to implement some kind of a cache so I don’t have to read a file every time I want to get its content. Don’t make that mistake.
Following this tutorial, you will learn how to use Contentlayer to do the heavy lifting for you.
You will learn how to build every part of a Markdown blog yourself using Contentlayer with TypeScript and Tailwind CSS. You will learn how to create:
- A common layout component
- A list of all blog posts
- A page for an individual blog post
In the end, I will also show you how to add MDX to your blog so you can use React components inside Markdown.
To see the full code, check out the GitHub repository for this project.
Setting up the Project
Before you can start coding, there’s some stuff you need to install and configure.
But even before that, you need to create a new project.
Creating a Next.js Project
First things first, open your terminal and navigate to somewhere where you want to store the folder of your blog.
Run the following command to create a Next.js project. It will ask you for a name, which will be used as the directory name in which your project files will be stored.
npx create-next-app@latest --typescript
The --typescript argument adds TypeScript to your project, which you can omit if you wish. But, I strongly recommend using TypeScript. It goes very well together with Contentlayer, which you will soon install.
With TypeScript, Contentlayer automatically generates types for your content. It brings type safety and code autocompletion without any extra work from your part.
Before you install anything, let’s clean up a bit. Delete the following things that you won’t need:
apifolder insidepagesfolderstyles/Home.module.cssfilefavicon.icoandvercel.svgfiles frompublicfolder
Move pages and styles folders into src directory. Although it’s optional, Next.js supports using src directory out of box. I prefer to organize my projects this way.
Adding Placeholder Content
Create a content directory in your project root folder where you will store your blog posts.
Every post you make needs a unique slug. A slug is the part of URL that identifies a post — example.com/posts/this-is-a-slug.
So, for each post, make a folder inside content and set its name to what you want the slug to be.
Add a post following the content/post-slug/index.md file structure. You should end up with something like this:
content/
├─ hello-world/
│  ├─ index.md
Add some content to the index.md file.
Hello World! This is my first post.

## Heading

A paragraph.

- A list
- Of some
- Related things
If you want to use images in your post, you need to place them inside public folder.
I recommend following the public/post-slug/image-name.jpg file structure to keep each post’s images separately. This way, image names from different posts won’t clash if they are not unique.
The source path of the image should be absolute, starting from public folder. An image placed in public/images/blog-post-slug/image.jpg should be imported like this:

I’ve written a post on how to keep images alongside your Markdown source files with a bit of coding.
Lastly, you should use front matter in your Markdown.
Front matter is used to store extra information about a blog post, like its title or the date when it was published. Contentlayer will separate front matter data from the main content automatically.
Front matter needs to be put between a pair of three dashes (---) above your main content.
---
title: Hello World
date: 2022-01-21T09:00:00.000Z
---

Hello World! This is my first post.
With some content in place, you can finally install and configure Contentlayer.
Setting up Contentlayer
Contentlayer transforms your content to code. You don’t have to worry about reading files, parsing their content and converting it all to objects that your code can work with.
You tell Contentlayer where your content lives and it generates JSON documents that your can then import and use in your code.
Now, go ahead and install Contentlayer.
npm install contentlayer next-contentlayer
Next, update next.config.js to wrap your Next.js config with Contentlayer’s withContentlayer utility.
const { withContentlayer } = require('next-contentlayer');

/** @type {import('next').NextConfig} */
const nextConfig = {
  reactStrictMode: true,
  swcMinify: true,
};

module.exports = withContentlayer({
  ...nextConfig,
});
Next, update the tsconfig.json file to include some path related confguration.
{
  "compilerOptions": {
    // ✂️
    "baseUrl": ".",
    "paths": {
      "contentlayer/generated": ["./.contentlayer/generated"]
    }
  },
  "include": ["next-env.d.ts", "**/*.ts", "**/*.tsx", ".contentlayer/generated"]
  // ✂️
}
And finally, create a contentlayer.config.js file and add the following config. This will turn your Markdown content into JSON documents that your code can easily work with.
import { defineDocumentType, makeSource } from 'contentlayer/source-files';

export const Post = defineDocumentType(() => ({
  name: 'Post',
  filePathPattern: '**/index.md',
  fields: {
    title: {
      type: 'string',
      required: true,
    },
    date: {
      type: 'date',
      description: 'When the post was published',
      required: true,
    },
  },
  computedFields: {
    slug: {
      type: 'string',
      resolve: post => {
        return post._raw.sourceFileDir;
      },
    },
  },
}));

export default makeSource({
  contentDirPath: 'content',
  documentTypes: [Post],
});
First, you are creating a schema using defineDocumentType that describes your blog posts.
The filePathPattern specifies which files relatively to the content folder are used for blog posts. The **/index.md pattern means that Contentlayer will look inside any subfolder (**) of content for an index.md file.
The fields property describes the data you use in front matter. And the computedFields are properties that can’t be found in the file itself but attached to a document by you. In this case, the slug will created using the folder name where each blog post is stored.
Second, you tell Contentlayer the parent folder of your content and register the schema with makeSource function.
Adding Tailwind CSS
Tailwind CSS is a CSS framework that contains utility classes for every CSS property. Instead of writing CSS, you write a bunch of class names.
I will be using Tailwind CSS in this tutorial to avoid writing CSS, but it is completely optional and you can skip this part.
Otherwise, let’s set up Tailwind CSS.
-
Run the following command to install Tailwind CSS dependencies
npm install -D tailwindcss postcss autoprefixer @tailwindcss/typographyThe
@tailwindcss/typographypackage is extra, but it adds some nice styling for typography -
Initialize Tailwind CSS
npx tailwindcss init -p -
Open and adjust the
tailwind.config.jsfile/** @type {import('tailwindcss').Config} */ module.exports = { content: [ './src/pages/**/*.{js,ts,jsx,tsx}', './src/components/**/*.{js,ts,jsx,tsx}' ], theme: { extend: {}, }, plugins: [ require('@tailwindcss/typography') ], }; -
Add Tailwind CSS imports to
global.cssand delete all other styles in there@tailwind base; @tailwind components; @tailwind utilities;
To verify that everything works so far, update the pages/index.tsx file to use Tailwind CSS classes.
export default function Home() {
  return (
    <>
      <h1 className="text-2xl sm:text-3xl font-bold text-slate-900 tracking-tight mb-3">Hello there!</h1>
      <p className="text-slate-700">Welcome to my new blog</p>
    </>
  );
}
And, with npm run dev running, visit localhost:3000 in your browser and check what you see.
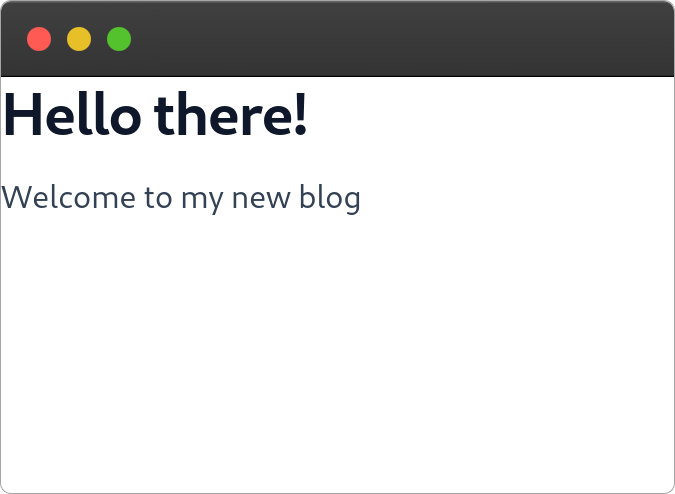
You can confirm that Tailwind CSS is working if you see the same styling.
Creating a Reusable Layout Component
Since all pages in a website follow one structure, it makes sense to create a layout component that you can reuse.
The layout should include:
- A header that’s at the top of the page, including navigation
- A main content area
- Optionally, a footer
Start by creating a Header component inside components/layout/Header.tsx.
import Link from 'next/link';

export default function Header() {
  return (
    <header className="mt-2 mb-5">
      <div className="flex justify-between items-center max-w-3xl mx-auto px-5">
        <p className="text-2xl font-extrabold">
          <Link href="/">
            <a title="Go to homepage" aria-label="Go to homepage">
              My Blog
            </a>
          </Link>
        </p>
        <nav>
          <Link href="/">
            <a className="text-blue-600 hover:text-blue-400">Posts</a>
          </Link>
        </nav>
      </div>
    </header>
  );
}
When your navigation grows with more more links, you create a separate Navigation component.
Next, create a Layout component in components/layout/Layout.tsx.
import Header from './Header';

export default function Layout({ children }: { children: React.ReactNode }) {
  return (
    <>
      <Header />
      <main className="px-5 max-w-3xl mx-auto">{children}</main>
    </>
  );
}
Finally, update pages/_app.tsx file to use the Layout component in every page.
import '../styles/globals.css';
import type { AppProps } from 'next/app';
import Layout from '../components/layout/Layout';

function MyApp({ Component, pageProps }: AppProps) {
  return (
    <Layout>
      <Component {...pageProps} />
    </Layout>
  );
}

export default MyApp;
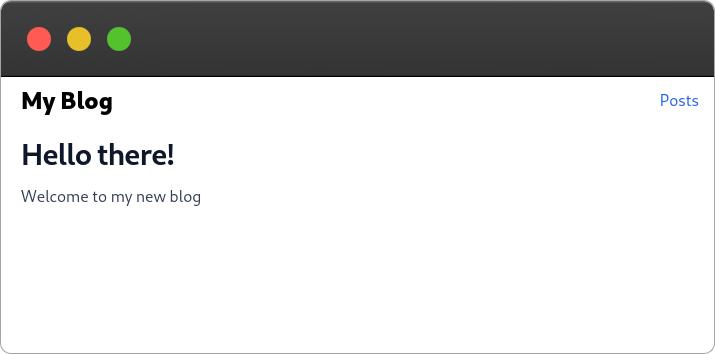
Here’s how the finished layout should look:
You can now add a footer yourself if you want one. But, with a basic layout in place, it’s time to create the blog post pages.
Listing All Posts
Let’s update the index.tsx file inside pages to display a list of posts on the home page.
import { allPosts, Post } from 'contentlayer/generated';
import Link from 'next/link';

export async function getStaticProps() {
  const posts = allPosts.sort((a, b) => {
    if (new Date(a.date).getTime() >= new Date(b.date).getTime()) {
      return -1;
    }

    return 1;
  });

  return {
    props: {
      posts,
    },
  };
}

export default function Home({ posts }: { posts: Post[] }) {
  const noPosts = <p className="text-slate-700">Nothing posted yet.</p>;
  const hasPosts = (
    <ul>
      {posts.map(post => {
        return (
          <li key={post.title} className="flex justify-between mb-3">
            <h2 className="text-lg text-slate-900 hover:text-blue-600">
              <Link href={`/posts/${post.slug}`}>
                <a>{post.title}</a>
              </Link>
            </h2>
            <p className="min-w-[90px] text-right text-slate-500">
              {new Date(post.date).toLocaleDateString('en-CA')}
            </p>
          </li>
        );
      })}
    </ul>
  );

  return (
    <>
      <h1 className="text-2xl sm:text-3xl font-bold text-slate-900 tracking-tight mb-3">
        Hello there!
      </h1>
      <p className="text-slate-700">Welcome to my new blog</p>
      <hr className="my-5" />
      {posts.length === 0 ? noPosts : hasPosts}
    </>
  );
}
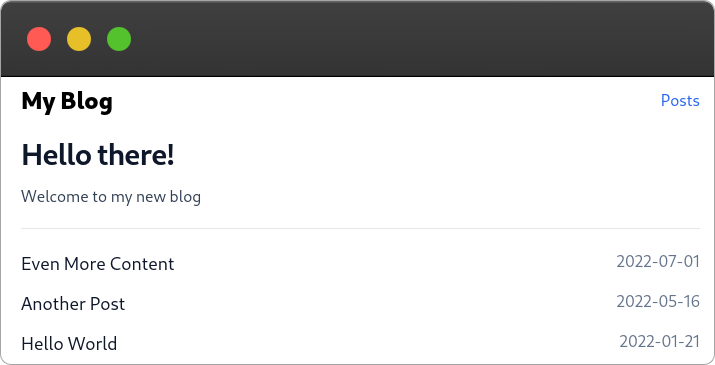
This should result in something like this.
Creating Post Pages
To create pages in Next.js, you need to create a file inside pages folder. The route of the page will match the file name. Since each post has needs it own route, you need to create a dynamic route.
Dynamic routes are made by wrapping a parameter (the dynamic part) of the route inside square brackets ([]). For a post, you can use its slug as the parameter.
Create a folder posts inside pages and put a [slug].tsx file inside of it. This file structure means that a post can be accessed under /posts/the-slug-of-post route.
The posts folder specifies parent route. You can change posts to anything you like, for example, blog.
If you want your posts to be under root path (/post-slug), put the [slug].tsx right inside pages folder, without a parent folder.
Now, open the [slug].tsx file and add the following code.
import Head from 'next/head';
import { allPosts, type Post } from 'contentlayer/generated';

export async function getStaticProps({ params }: { params: { slug: string } }) {
  const post = allPosts.find(postFromAll => postFromAll.slug === params.slug);

  return {
    props: {
      post,
    },
  };
}

export async function getStaticPaths() {
  const slugs = allPosts.map(post => post.slug);
  const paths = slugs.map(slug => {
    return { params: { slug } };
  });

  return {
    paths,
    fallback: false,
  };
}

export default function Post({ post }: { post: Post }) {
  return (
    <>
      <Head>
        <title>{post.title}</title>
      </Head>
      <article className="prose prose-slate">
        <h1 className="text-center mb-3">{post.title}</h1>
        <p className="text-slate-500 text-center">
          Posted on{' '}
          <time dateTime={post.date} title={new Date(post.date).toString()}>
            {new Date(post.date).toLocaleDateString('en-CA')}
          </time>
        </p>
        <div dangerouslySetInnerHTML={{ __html: post.body.html }} />
      </article>
    </>
  );
}
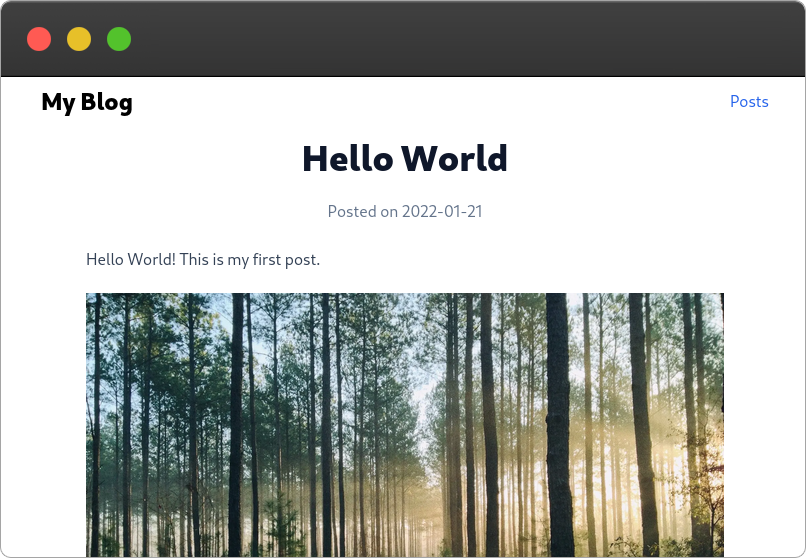
If you navigate to /posts/hello-world route, you should see your blog post.

Adding MDX
Contentlayer let’s you choose Markdown or MDX in its config. You can even use both at the same time, which is super handy if you are migrating your blog from plain Markdown to MDX. You don’t need to change every single file extension.
Update the contentlayer.config.js file to use MDX and look for .mdx files.
export const Post = defineDocumentType(() => ({
  // ✂️
  filePathPattern: '**/index.{md,mdx}',
  contentType: 'mdx',
}));
You can set the pattern to **/index.{md,mdx} to be able to use both .md and .mdx files in your project at the same time.
Update [slug].tsx page to use MDX.
// ✂️
import Image from 'next/image';
import { useMDXComponent } from 'next-contentlayer/hooks';

// ✂️

export default function Post({ post }: { post: Post }) {
  const components = {
    Image,
  };
  const MDXContent = useMDXComponent(post.body.code);

  return (
    <>
      <Head>
        <title>{post.title}</title>
      </Head>
      <article className="prose prose-slate lg:prose-xl">
        <h1 className="text-center mb-3">{post.title}</h1>
        <p className="text-slate-500 text-center">
          Posted on{' '}
          <time dateTime={post.date} title={new Date(post.date).toString()}>
            {new Date(post.date).toLocaleDateString('en-CA')}
          </time>
        </p>
        <MDXContent components={components} />
      </article>
    </>
  );
}
Notice that the content now is inside the code and not the html property.
To use components in your Markdown, you must pass them to MDXContent via its components prop. In this case, we pass Next.js Image component.
Now, change the Markdown file extension to .mdx and use the registered component in your content.
---
title: Hello World
date: 2022-01-21T09:00:00.000Z
---

Hello World! This is my first post.

<Image alt="Forest" src="/images/hello-world/image.jpg" width={960} height={720} />
Summary
Congratulations! 🎉 You made it all the way to the end. You now have a great starting point to build an amazing blog.
So far you’ve built a home page that lists all your blog posts and a page for individual posts.
Now it’s up to you to add more features, such as syntax highlighting for code blocks.